button plant succulent String of Buttons 'Crassula Perforata' 2" Pot
SKU: 37576842835
button plant succulent

button plant succulent String of Buttons 'Crassula Perforata' 2" Pot

Sale price$19.45 Regular price$21.61
Save 10%

Shipping Estimate
USA
  • USA
  • CAN

Ships within 48 hours · Estimated delivery Jul 7 - Jul 12

Promo Codes Available:

For Your Every Summer RSVP, with Code: SUMMER15

Description

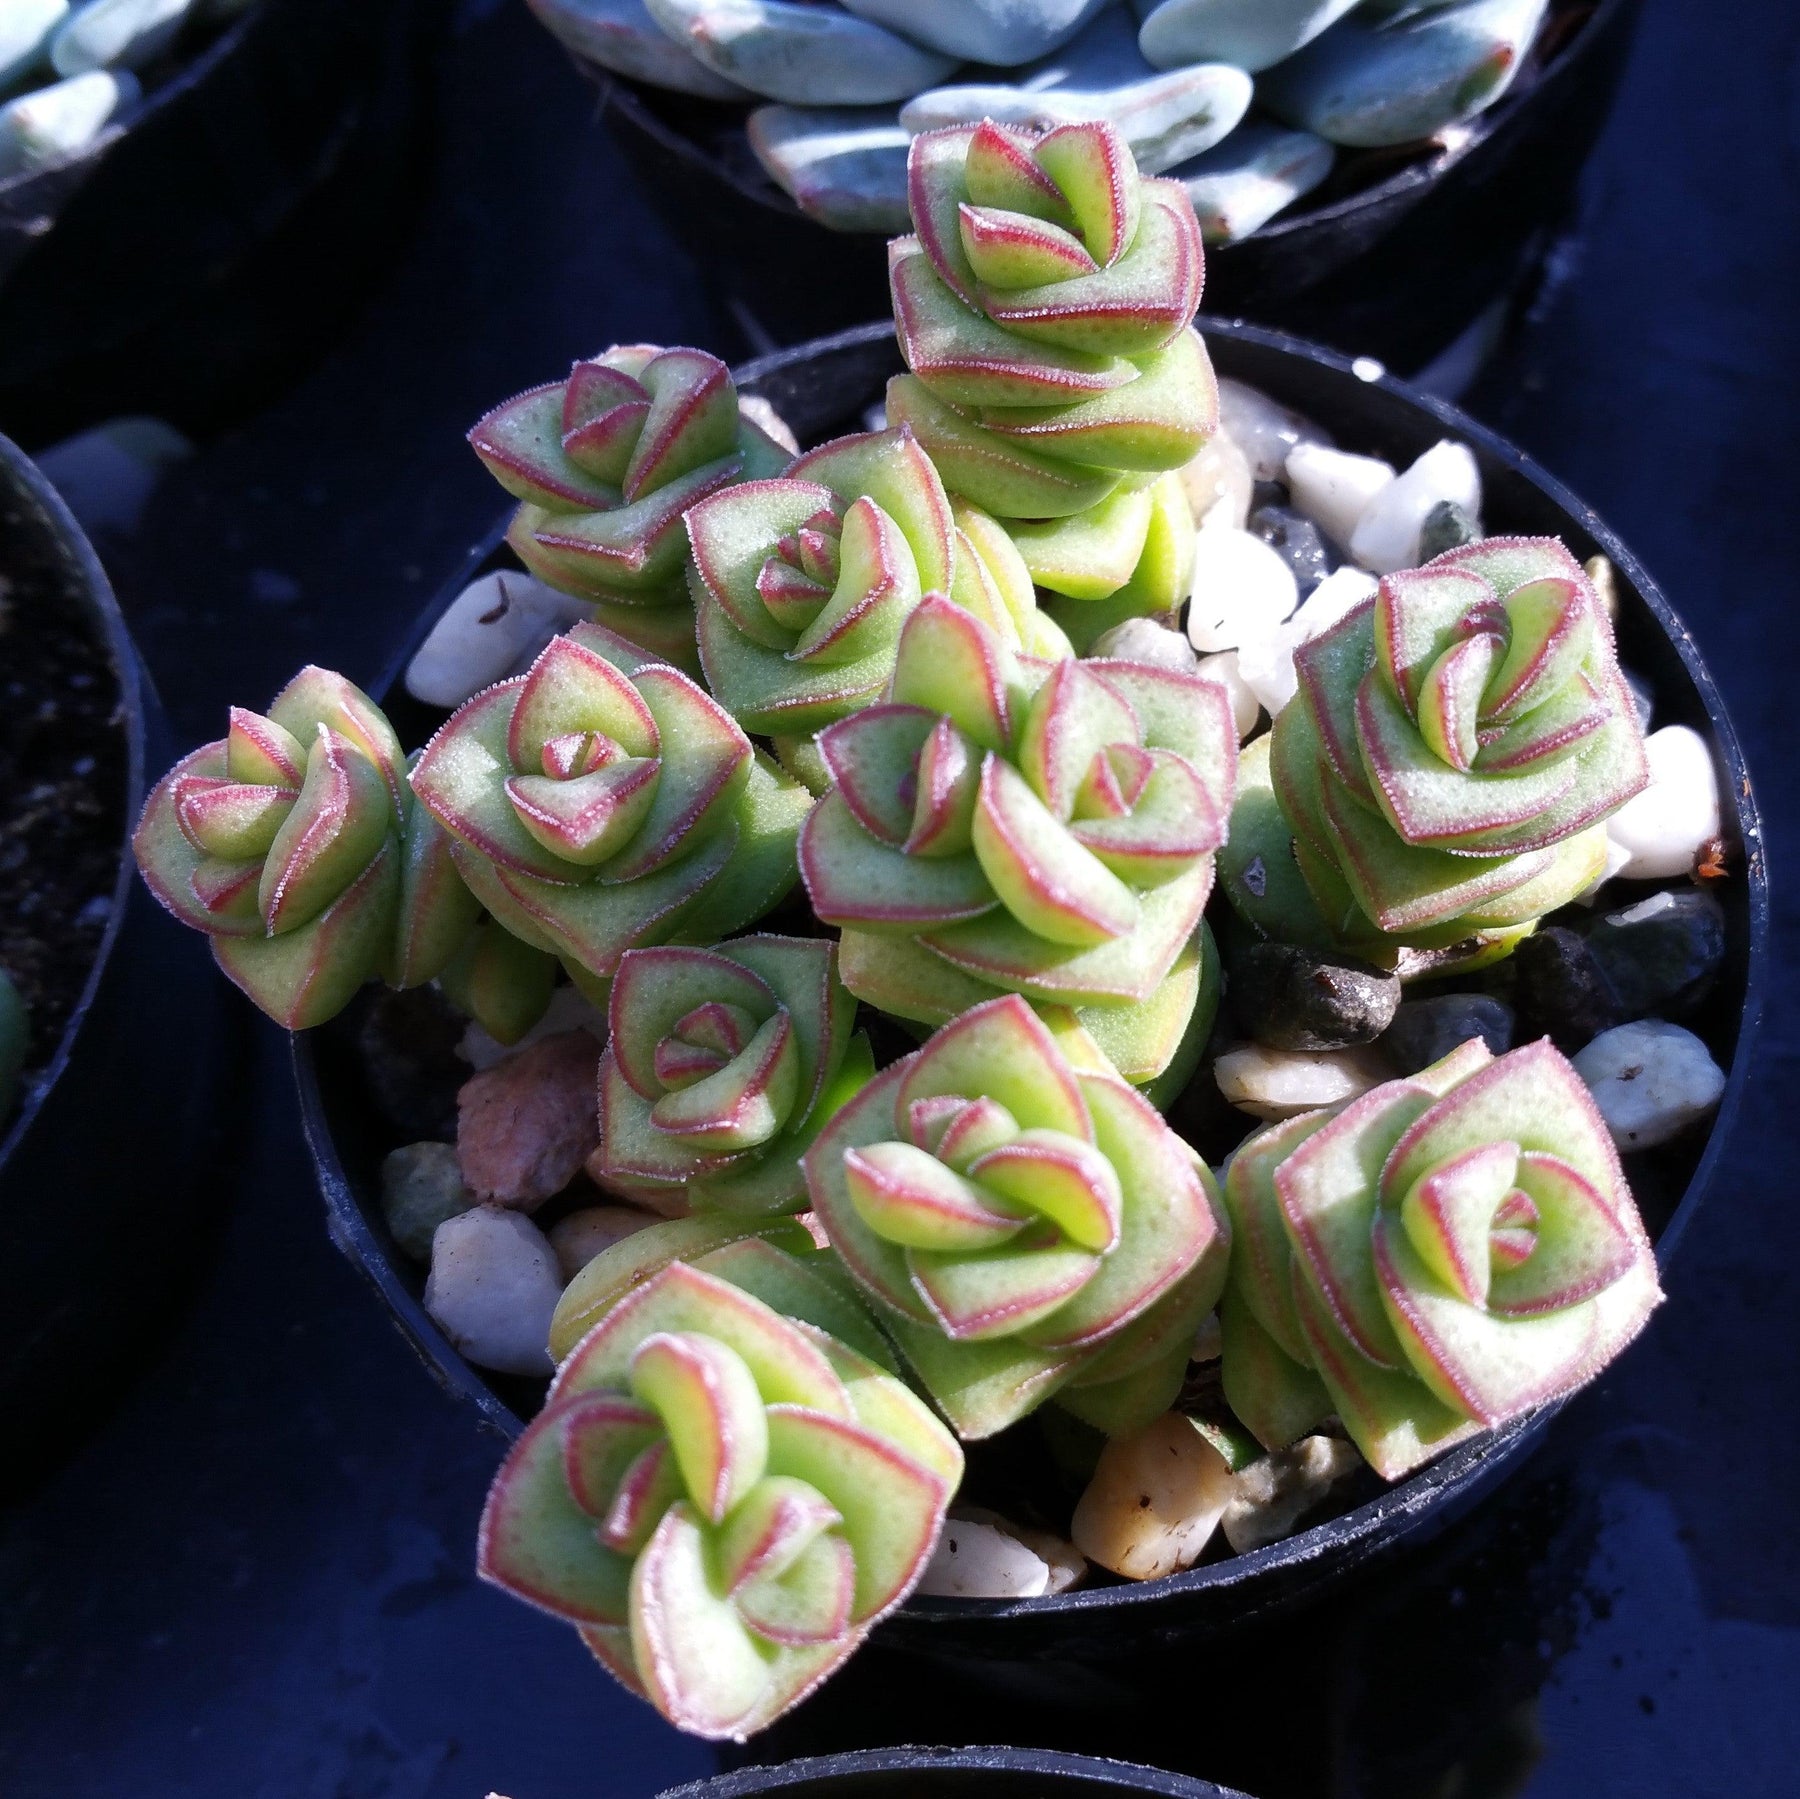
button plant succulent String of Buttons 'Crassula Perforata' 2" PotGardeners, are you looking for a truly unique hanging plant for your Crassula plant collection? Look no further than the Crassula perforata, also known as the String of buttons or necklace vine! It gets its common name from its distinctive button like leaves and trailing growth habit. The string of buttons is a succulent with square or triangle shaped fleshy leaves that create a spiral shape around the plant's stem long enough to give it a stacked

Gardeners, are you looking for a truly unique hanging plant for your Crassula plant collection? Look no further than the Crassula perforata, also known as the String of buttons or necklace vine! It gets its common name from its distinctive button-like leaves and trailing growth habit. 

The string of buttons is a succulent with square or triangle-shaped fleshy leaves that create a spiral shape around the plant's stem long enough to give it a stacked appearance resembling a string of buttons or beads. The gray-green leaves can take on a pink hue when exposed to sufficient light. Its unique appearance and fast-growing habit make it a real eye-catcher in any collection. 

The crassula perforata is a compact plant that can grow up to 18 inches tall and 3 feet wide. Its fleshy stems are upright at first and then become pendants over time, making them ideal for hanging baskets or cascading over the edges of shelves or containers.

In late spring to early summer, the Crassula perforata string of buttons produces small, star-shaped pale pink, white, or pale-yellow flowers. These delicate blooms add a touch of charm to the already stunning Crassula plants. 

To propagate Crassula perforata can be easily achieved by leaf cuttings or stem cuttings. Remember, the Crassula perforata is a species of succulent plant, while the Crassula perforata variegata - Variegated string of buttons is a variety of the stacked Crassula perforata species with variegated leaves. According to ASPCA, this string of buttons is safe for both humans and pets. 

 Watering Requirements

To water your Crassula perforata, simply give it a good drink when the top inch of soil feels dry to the touch. Be sure to water thoroughly, allowing the water to soak through the soil and drain out of the bottom of the container. After watering, wait until the soil is completely dry before watering again. 

This lovely string of buttons prefers a watering routine that allows the soil to dry out between waterings. It's important to avoid overwatering, as this can lead to root rot and other issues. During the summer months or when this Crassula perforata is in a dormant phase, you can reduce the frequency of watering. This succulent plant is quite drought-tolerant, so it's better to underwater than to overwater. 

Remember, each Crassula plant's watering needs may vary depending on factors like humidity, temperature, and the size of the pot.  Always keep an eye on the soil's moisture level and make necessary adjustments to your watering schedule. 

Light Requirements 

The Crassula perforata thrives in bright full sunlight to light shade for at least 4-6 hours to maintain its compact foliage. If growing indoors, the string of buttons prefers a spot near a window where it can receive plenty of bright light throughout the day. Avoid placing it in direct sunlight, as this can scorch the leaves. 

If you notice that your Crassula perforata is stretching or leaning toward the light, it may be an indication that it needs more light. On the other hand, if the leaves start to turn yellow or brown, it could be a sign of too much direct sunlight. 

Finding the right balance of light for your Crassula perforata is key to its overall health and growth. So, keep an eye on its response to the light and adjust its placement accordingly. 

 Optimal Soil & Fertilizer Needs 

Crassula perforata thrives in well-draining soil with a pH of almost 5.6 - 6.5. A good choice is a succulent soil mix, which provides the right balance of moisture retention and drainage. Moisture can be a real killer, leading to root and stem rot in no time flat. But fear not my fellow green thumbs!  

Planet Desert has got your back with our specialized succulent potting mix that includes 5 natural substrates with organic mycorrhizae perfect for promoting healthy roots and happy Crassula plants. You can also create your own mix by combining regular potting soil with perlite or coarse sand to improve drainage. 

When it comes to fertilizing, Crassula perforata doesn't require frequent feeding. During the active growing season in spring, you can use a balanced natural fertilizer NPK. Apply the fertilizer once a year and avoid overfertilization as it can cause the death of the whole string of buttons succulent. However, it's important to avoid over-fertilizing, as this can lead to excessive growth and weak stems. 

Hardiness Zones & More 

The crassula perforata string of buttons is generally hardy in USDA hardiness zones 9-11. The string of buttons, on the other hand, cannot handle frost, cold, or freezing temperatures, so make sure it doesn't get below 45 degrees Fahrenheit in its environment. It prefers temperatures between 60-75°F during the day and slightly cooler temperatures at night. 

In terms of humidity, Crassula perforata is adaptable and can tolerate a range of humidity levels. These Crassula succulents can thrive in average indoor humidity, but it's important to avoid excessively dry air, especially during the winter months when indoor heating can cause low humidity. If the air in your home is particularly dry, you can increase humidity by using a humidifier or placing a tray of water near the plant to provide some moisture.

Be sure to add Crassula perforata - a string of buttons - to your collection today and elevate the beauty of your home or garden, with this stunning-looking plant.

Shipping Notes
  • Free Standard Shipping on $100+ Orders to the USA.
  • Except Preorder products are shipped in 48 hours.
  • Delivery to the USA:
  1. Standard Shipping : 3-10 business days
  • If time is of the essence, please consider selecting expedited delivery for faster service.
Exchange/Return Notes
  • We offer a 30-day return/exchange service after receiving.
  • Final sale items are not eligible for returns or exchanges.
  • To process your return/exchange, please contact us at [email protected]
  • Please click here for more details>>> Return & Exchange Policy
SKU: 37576842835

Discover Niche Categories That Outsell button plant succulent

Top-Converting Item to Boost Your Average Order

4.1 ★★★★★
Based on 1540 reviews
Sort
Highest Rating
Newest First
Oldest First
Product Reviews
E
Verified Purchase
Eric J. Jenislawski
Fort Morgan, US
★★★★★ 5
Great result, exceptional value, and easy, forgiving application.
Size: TRIM COAT KIT
I am thoroughly pleased with the results of this product, and the application was easier than I expected. Outstanding stuff. I am writing a longer review in case it helps people who are unsure about a "once and done" product that calls itself permanent. It's not hard to apply. It is forgiving and there's time to even it out. But here are some things to anticipate. My use case: I used Cerakote to restore the plastic trim on a used 2014 black Dodge Challenger that had been repainted but the plastic trim was original and it had been kept outside by the prior owner, so the contrast between the new paint and faded trim was noticeable. The trim was originally a deep, dark gray (it is never as black as the paint). It had faded to a medium-gray in many places: running boards on the side beneath the door, below the read bumper (which were also somewhat worn from debris), around the tail lights, and the plastic piece beneath the windshield wipers between the windshield and the hood. These were all looking weathered. The trim was very oxidized in some places, chalky grey near the hood and around the back bumper. The plastic around the tail lights also had light streaks in it from where water drains down from the trunk. What else I tried before I tried Cerakote: I got middling results from Mother's Back to Black. It looked somewhat better for a week or two, and then it went back to looking as before. Not impressed. I got a tip online to try rubbing the plastic trim with a melamine magic eraser, so I did that next, and this made a significant difference. Melamine is abrasive, so be careful if you do this on your trim. I went gently, up-and-down, side-to-side and in small circles, by hand, with gentle pressure like one would with a polishing compound. By removing the oxidation, the plastic was a few shades darker in the worst spots and the streaking on the rear tail light piece was gone. The rough spots on the trim at the bottom of the car and around the wheels looked somewhat better. But it certainly did not "like new." Cerakote experience: I decided to give Cerakote a try based on the video and good reviews. Bam! Back to factory-like deep dark gray. I wish I had taken pictures. It's incredible. Fully satisfied! I had already washed the trim with Dawn dish soap. I started with the trim bone dry. You are warned everywhere that water droplets will ruin the result, so don't expect to do this process right after you wash the car unless you like to live dangerously and have compressed air to spray cracks and crevices. I was worried that application would be streaky if I didn't do it right. Not so. It is forgiving. Here's what I learned. 1) The first 20% of what you'll get out of the packet goes on heavy with the lightest touch. One packet goes a long way. The next 60% is the "normal" application. This goes on the easiest. You can really milk the last drop out of each towelette, but I didn't because the last 20% of what you can get out of it by rubbing it really hard comes out very light and is not worth the uneven application unless you have some random area you don't care much about and want to use the remainder for that. I only used 5 packets to do the whole car. When you start a new packet, the beginning is where you might want to go back later and even it out once the application gets more normal. Or better, start a new packet on a big section to spread it around well and then move to smaller trim when the towelette is less fresh. 2) You've got time to work with it and make corrections. It stayed liquid like water for at least 20 minutes in my conditions: about 80 degrees, not very humid, indirect sunlight on an 80 degree car. Don't apply in direct sun or on a hot car. The product then gets sticky as it cures, but you can still work with it during the sticky time, rubbing it in and spreading it evenly with the towelette. I did not use a microfiber to "knock down" heavy spots. I just came back around with the towelette. I think a dry microfiber might pull off too much product. When it is half-cured, it is sticky and you can buff it with the towelette at this stage to further flatten and even things out. Work in sections, one piece of trim at a time. 3) Overlaps won't show as long as you rub it all in thoroughly. I tried the overlapping parallel passes method that they recommend, and this works pretty well. I was worried that I might get a "double heavy" streak where the passes overlap but this not so unless the towelette is fresh, but this is fixable. You can do a pretty natural, casual back-and-forth motion for the most part and it comes out fine. This is NOT a super-finicky product. I made a second or third back-and-forth pass in a few areas, and used circular motion in some places where the trim was textured or a little rough from wear, and it all looked even in the end. Just rub it down into the plastic and even out the sheen while it is uncured and it's good. 4) It cures like you see it when it's still wet. It doesn't lighten up very much as it cures. It just looks a little less wet. So get it right by eye when it is wet and that's pretty much what you will still have in an hour when it is cured. 5) Don't miss a spot! You'll see it for sure if you do because the different is so dramatic. And a "second coat" is not easy or recommended. This is the only once-and-done part that you want to get right, and you have plenty of cure time to be thorough. 6) Use the folded corner of the towelette to get into small corners and edges, like where the trim meets the paint or has an inside corner or some little nook. A fresh towelette is great for getting into small areas because a feather touch applies plenty of product when the towelette is fresh. The trim now looks amazing and I am entirely satisfied. I will use Cerakote on my other vehicles. The only minor con is a strong ammonia smell when you are up close to it while it is wet. No smell once it is cured. I would definitely wear the recommended gloves while applying. As others say, you will probably drop that towelette on the ground. It's slippery when wet. Keep it folded in quarters as it comes for ease of application. Turn to a new quarter once a side gets dirty or dry and fold it inside out for four more quarters to use. Bonus, but off-label -- at your own risk: The product is not intended for the soft rubber around the windows, but I tried it there too, and it looks amazing. All I did was wash the rubber with dish soap like the trim, and I rubbed it a few times with a wet microfiber cloth to get the superficial layer of oxidized rubber off. Then I applied Cerakote. It looks great. The rubber used to be blotchy and faded. The microfiber evened this out a little. I would not use melamine on the rubber -- this made it look worse in a test section. The Cerakote made it look great: jet black, much shiner, and much more even looking. Not quite "brand new" but far better than I thought possible. I thought I might need to replace the rubber. Now it's looking great next to the jet-black new paint. This afterthought use alone was worth the money. Can you apply a second coat the next day? They don't say you can, and I don't recommend it. This is meant to be one-shot, which is why you should check to make sure you don't miss any spots. I had two areas where I tried a second coat the next day. The first was on the plastic trim between the windshield and the hood. I didn't rub this trim much with melamine beforehand so there was a lighter area (light grey originally, the worst spot) that didn't get as black as the other sections so I did it again, which helped a little, but not much. I didn't wash this area with soap beforehand because I wasn't intending to fix it until I got going. Once you put things back to black you will start noticing other faded things more. Likewise, I did a second coat on the very top of the soft rubber at the bottom of the windows (the part which faces upward and thus gets the most sun), it wasn't as shiny as the other parts, so I went over that section gently again the next day with a fresh towelette. As soon as I did it, I thought it was a mistake. This didn't go well initially because the cured coating is very hydrophobic so the new, wet, Cerakote of the second coat goes on smooth initially and then "puddles up" into little droplets a few minutes later. It doesn't want to stick to the first coat. I thought I had messed it up, but I let it cure a little until the sticky phase, and spread it out again with the towelette. It stayed that time but gathered back a little into some streaks. I spread it once more a few minutes later and it looked good. It stayed even. It looks just fine a few days later, so I think it cured OK. I hope this product last for months as advertised. Even if it doesn't I would totally do it again because the results are superior, I still have half my towelettes left, and the product is not expensive. 10/10 would do again and will recommend to everyone.
WAS THIS REVIEW HELPFUL?YesReportShare
Reviewed in the United States on June 25, 2025
R
Verified Purchase
Robert Barger
Port Orchard, US
★★★★★ 5
Easy to use, amazing results
Size: TRIM COAT KIT
This is an awesome product that is easy to use and has amazing results. My plastic trim never looked so good.
WAS THIS REVIEW HELPFUL?YesReportShare
Reviewed in the United States on May 14, 2026
N
Verified Purchase
NorthFloridaLT
Lexington, US
★★★★★ 5
Made My Bumper Look Brand New Again
Size: TRIM COAT KIT, Size: TRIM COAT KIT
I used this on the plastic trim and bumper on my truck, and I’m honestly impressed with how it turned out. The faded areas came back to a deep, rich black and really cleaned up the whole look of the rear end. I prepped everything the right way by washing it first with an all purpose cleaner, then wiping it down with 91% alcohol. I also taped off the surrounding paint and chrome just to be safe. After that, the application was simple and went on smooth without any streaks or blotchy spots. The difference was immediate. What used to look dull and worn now looks factory-fresh again. It also seems to bond well and not just sit on the surface like some cheaper products I’ve tried before. Overall, this was easy to use, gave great results, and made a noticeable improvement. I would definitely use it again on other trim pieces.
WAS THIS REVIEW HELPFUL?YesReportShare
Reviewed in the United States on April 12, 2026
E
Verified Purchase
E N.
Dallas, US
★★★★★ 4
Good product
Size: TRIM COAT KIT
Good coverage. I've had it on for about 10 days, and it's holding up better than any spray product I've used. Not perfect, but none of those streak lines you get with other products. It's been rained on twice so far.
WAS THIS REVIEW HELPFUL?YesReportShare
Reviewed in the United States on May 8, 2026
E
Verified Purchase
ernieupton
Dallas, US
★★★★★ 5
good product and value
Size: TRIM COAT KIT
worked great on the 10yr old outback. Lasted several months..until we traded it in for a new outback.. will find something else to use it on...!
WAS THIS REVIEW HELPFUL?YesReportShare
Reviewed in the United States on May 20, 2026

recommand products