mature anthurium warocqueanum Anthurium Warocqueanum (Queen Anthurium)
SKU: 29080901369
mature anthurium warocqueanum

mature anthurium warocqueanum Anthurium Warocqueanum (Queen Anthurium)

Sale price$19.98 Regular price$22.20
Save 10%

Shipping Estimate
USA
  • USA
  • CAN

Ships within 48 hours · Estimated delivery Jul 7 - Jul 12

Promo Codes Available:

For Your Every Summer RSVP, with Code: SUMMER15

Description

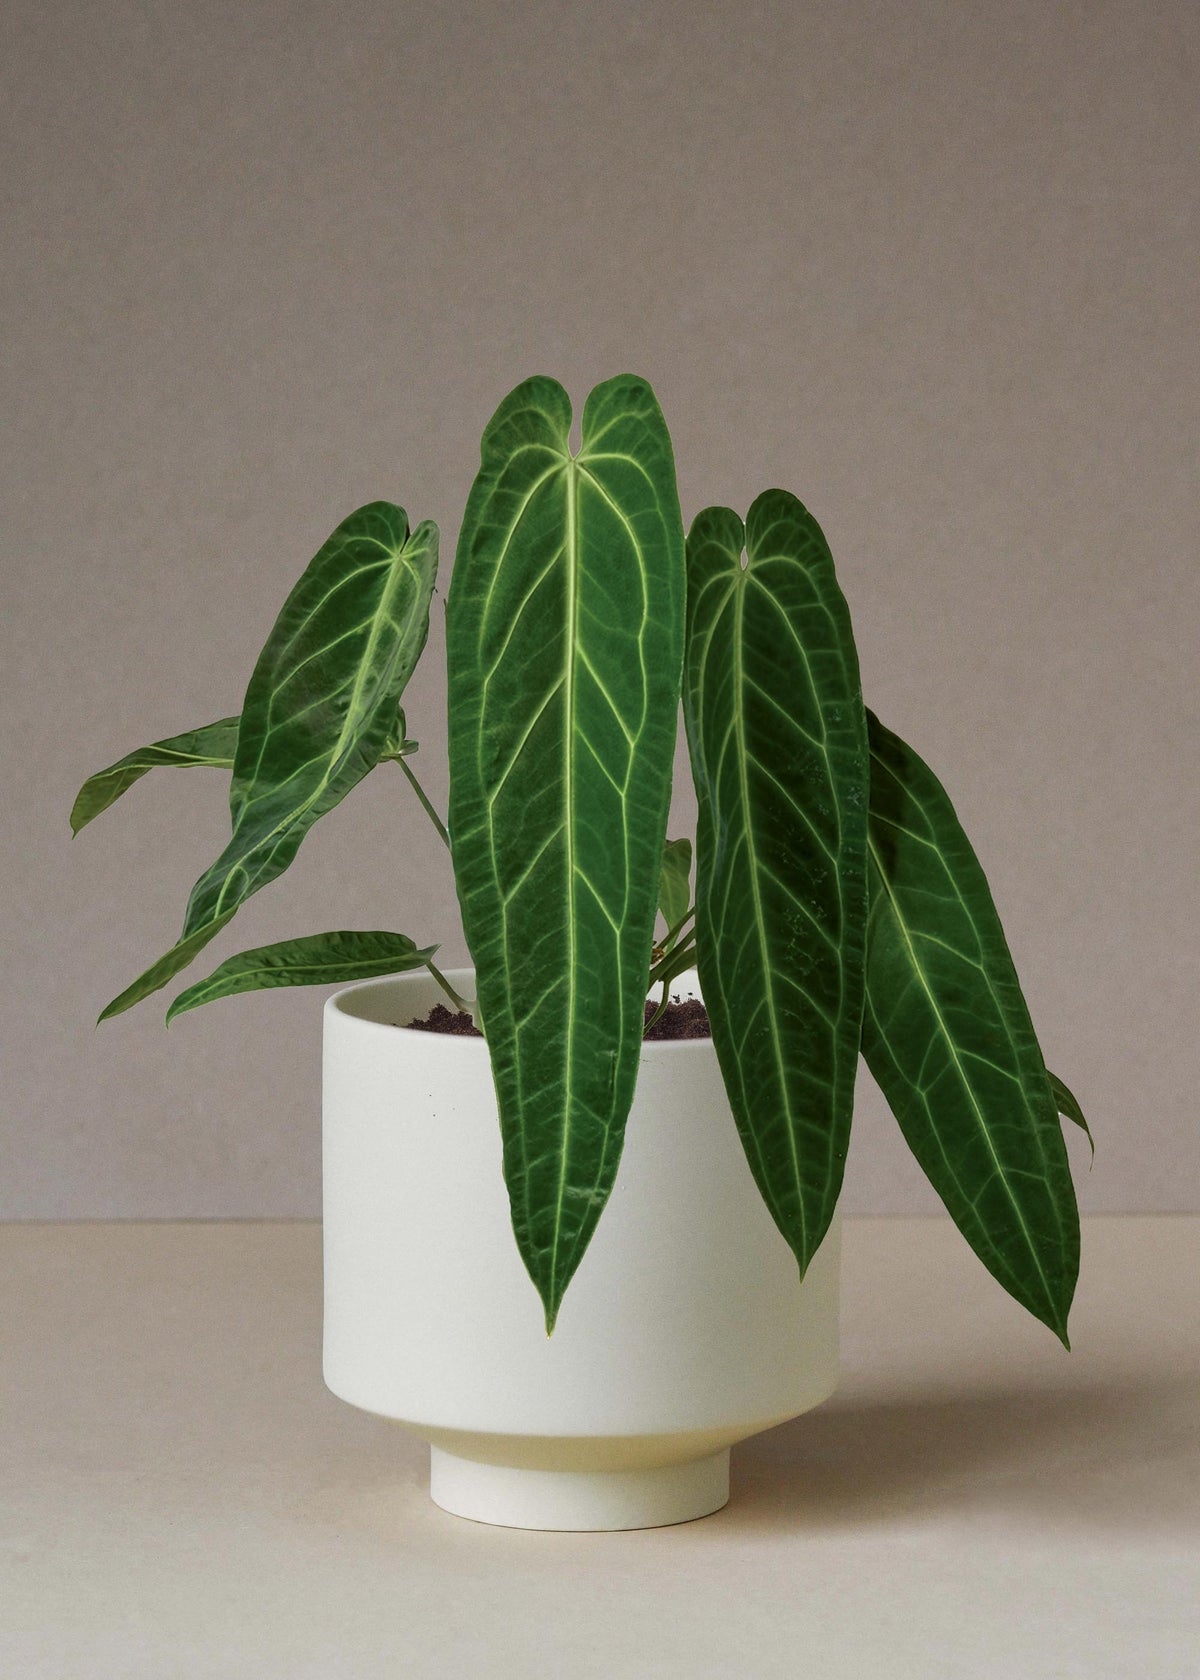
mature anthurium warocqueanum Anthurium Warocqueanum (Queen Anthurium)The Velvet Queen of Aroids Meet the legendary Anthurium Warocqueanum, the undisputed Queen of the collector world. Renowned for its dramatic, dark green, velvety leaves that can grow to astonishing lengths, this plant is a breathtaking centrepiece. The foliage feels like crushed velvet, with crystalline silver veins that shimmer in the light. This is not a beginner's houseplant; it's a rewarding project for the dedicated aroid enthusiast who is ready

The Velvet Queen of Aroids

Meet the legendary Anthurium Warocqueanum, the undisputed Queen of the collector world. Renowned for its dramatic, dark green, velvety leaves that can grow to astonishing lengths, this plant is a breathtaking centrepiece. The foliage feels like crushed velvet, with crystalline silver veins that shimmer in the light. This is not a beginner's houseplant; it's a rewarding project for the dedicated aroid enthusiast who is ready for a challenge. The Queen demands specific conditions, particularly high humidity, making it a perfect candidate for a greenhouse cabinet or a carefully controlled indoor environment. Grown right here in the EU with love, this young plant is your chance to raise royalty.

Why You'll Love It

  • Unmatched Foliage: Experience the iconic, elongated leaves with a deep velvet texture and striking silver venation that defines a high-end collection.
  • A Rewarding Challenge: Successfully growing a Warocqueanum is a true badge of honour for any plant collector, offering immense satisfaction as it unfurls each new, majestic leaf.
  • Statement Piece: Even as a juvenile plant, its unique texture and form command attention and signal a sophisticated taste in botanicals.
  • Collector's Classic: Owning a Queen Anthurium is a rite of passage for many serious aroid collectors; it's a living work of art with enduring appeal.

Care Essentials

Light: Provide very bright, indirect light. An east-facing window or a spot a metre or two back from a south or west-facing window is ideal. It must be protected from direct sun, which will scorch the delicate leaves. Insufficient light will result in slow growth and smaller leaves.

Water: This is critical. Water thoroughly when the top 2-3 cm of the substrate feels dry to the touch. It must never sit in water, as its fine roots are highly susceptible to rot. When in doubt, it's better to wait another day. During winter, reduce watering frequency as growth slows.

Soil/Substrate: A super chunky, airy, well-draining aroid mix is non-negotiable. Our aroid substrate mix is perfect, or you can create your own using a blend of orchid bark, perlite, coco chunks, and charcoal to ensure maximum oxygen at the roots.

Humidity & Airflow: The Queen demands high humidity, consistently above 70%. This is best achieved in a greenhouse cabinet, a terrarium, or with a powerful humidifier running nearby. It also appreciates gentle airflow to prevent fungal issues, so avoid completely stagnant air.

Pet Safety

Important: Like other members of the Araceae family, Anthurium Warocqueanum is toxic to cats, dogs, and humans if ingested. The plant contains calcium oxalate crystals which can cause irritation and swelling. Please place it safely out of reach of curious pets and children.

Common Issues

  • Crispy Leaf Edges/Tips: The most common issue, almost always caused by insufficient humidity.
  • Yellowing Leaves: Can be a sign of overwatering (check the roots for rot), or simply the plant shedding an older leaf to focus energy on new growth, which is common during acclimation.
  • Brown Spots on Leaves: Could be a bacterial/fungal issue from water sitting on the leaves in a low-airflow environment, or sometimes from sunburn.
  • Stunted Growth: Usually a result of inadequate light, low humidity, or being kept in a substrate that is too dense and wet.

Botanical Background

Native to the warm, wet, tropical rainforests of Colombia, Anthurium warocqueanum grows as an epiphyte on the trunks of trees. Understanding its natural habitat is key to its care: it's used to dappled light filtering through the canopy, high humidity, frequent rainfall, and having its roots exposed to plenty of air. Replicating these conditions is the path to success. The common name "Queen Anthurium" is a nod to its regal and demanding presence, a fitting title for such a spectacular species.

Frequently Asked Questions

Why are the leaves on my new Anthurium warocqueanum turning yellow or crispy?
This is very common. The Queen Anthurium is famously sensitive to changes in environment and shipping stress. Yellowing can indicate overwatering or the plant resorbing energy from an older leaf to acclimate. Crispy edges almost always point to low humidity. Upon arrival, place it in a high-humidity (70%+) location with gentle airflow and bright, indirect light, and be very careful not to overwater as it settles in. Expect a period of adjustment.

Does Anthurium warocqueanum need a greenhouse or cabinet to thrive?
While not strictly mandatory, it is highly recommended. The Queen requires consistent high humidity (ideally 70%+) that is difficult to maintain in a typical European living room, especially with central heating in winter. A greenhouse cabinet, terrarium, or a dedicated room with a humidifier will give you the best chance of success and help it produce those magnificent, long leaves. It is not a suitable plant for average room humidity.

The title says 'XL', but the pot size seems small. Is this a mature plant?
This 'XL' refers to the genetic potential of the plant, not its current size. You are purchasing a healthy, established juvenile Anthurium warocqueanum. These plants are slow growers, and starting with a strong young plant allows you to acclimate it to your specific conditions from an early stage, which is often more successful than introducing a large, mature specimen. It has the potential to grow spectacular, metre-long leaves with proper care over time.

Ready to accept the challenge and welcome royalty into your home? We are here to support your journey with this incredible plant.

Explore More

Shipping Notes
  • Free Standard Shipping on $100+ Orders to the USA.
  • Except Preorder products are shipped in 48 hours.
  • Delivery to the USA:
  1. Standard Shipping : 3-10 business days
  • If time is of the essence, please consider selecting expedited delivery for faster service.
Exchange/Return Notes
  • We offer a 30-day return/exchange service after receiving.
  • Final sale items are not eligible for returns or exchanges.
  • To process your return/exchange, please contact us at [email protected]
  • Please click here for more details>>> Return & Exchange Policy
SKU: 29080901369

Discover Niche Categories That Outsell mature anthurium warocqueanum

Top-Converting Item to Boost Your Average Order

4.1 ★★★★★
Based on 460 reviews
Sort
Highest Rating
Newest First
Oldest First
Product Reviews
E
Verified Purchase
Eric J. Jenislawski
Battle Creek, US
★★★★★ 5
Great result, exceptional value, and easy, forgiving application.
Size: TRIM COAT KIT
I am thoroughly pleased with the results of this product, and the application was easier than I expected. Outstanding stuff. I am writing a longer review in case it helps people who are unsure about a "once and done" product that calls itself permanent. It's not hard to apply. It is forgiving and there's time to even it out. But here are some things to anticipate. My use case: I used Cerakote to restore the plastic trim on a used 2014 black Dodge Challenger that had been repainted but the plastic trim was original and it had been kept outside by the prior owner, so the contrast between the new paint and faded trim was noticeable. The trim was originally a deep, dark gray (it is never as black as the paint). It had faded to a medium-gray in many places: running boards on the side beneath the door, below the read bumper (which were also somewhat worn from debris), around the tail lights, and the plastic piece beneath the windshield wipers between the windshield and the hood. These were all looking weathered. The trim was very oxidized in some places, chalky grey near the hood and around the back bumper. The plastic around the tail lights also had light streaks in it from where water drains down from the trunk. What else I tried before I tried Cerakote: I got middling results from Mother's Back to Black. It looked somewhat better for a week or two, and then it went back to looking as before. Not impressed. I got a tip online to try rubbing the plastic trim with a melamine magic eraser, so I did that next, and this made a significant difference. Melamine is abrasive, so be careful if you do this on your trim. I went gently, up-and-down, side-to-side and in small circles, by hand, with gentle pressure like one would with a polishing compound. By removing the oxidation, the plastic was a few shades darker in the worst spots and the streaking on the rear tail light piece was gone. The rough spots on the trim at the bottom of the car and around the wheels looked somewhat better. But it certainly did not "like new." Cerakote experience: I decided to give Cerakote a try based on the video and good reviews. Bam! Back to factory-like deep dark gray. I wish I had taken pictures. It's incredible. Fully satisfied! I had already washed the trim with Dawn dish soap. I started with the trim bone dry. You are warned everywhere that water droplets will ruin the result, so don't expect to do this process right after you wash the car unless you like to live dangerously and have compressed air to spray cracks and crevices. I was worried that application would be streaky if I didn't do it right. Not so. It is forgiving. Here's what I learned. 1) The first 20% of what you'll get out of the packet goes on heavy with the lightest touch. One packet goes a long way. The next 60% is the "normal" application. This goes on the easiest. You can really milk the last drop out of each towelette, but I didn't because the last 20% of what you can get out of it by rubbing it really hard comes out very light and is not worth the uneven application unless you have some random area you don't care much about and want to use the remainder for that. I only used 5 packets to do the whole car. When you start a new packet, the beginning is where you might want to go back later and even it out once the application gets more normal. Or better, start a new packet on a big section to spread it around well and then move to smaller trim when the towelette is less fresh. 2) You've got time to work with it and make corrections. It stayed liquid like water for at least 20 minutes in my conditions: about 80 degrees, not very humid, indirect sunlight on an 80 degree car. Don't apply in direct sun or on a hot car. The product then gets sticky as it cures, but you can still work with it during the sticky time, rubbing it in and spreading it evenly with the towelette. I did not use a microfiber to "knock down" heavy spots. I just came back around with the towelette. I think a dry microfiber might pull off too much product. When it is half-cured, it is sticky and you can buff it with the towelette at this stage to further flatten and even things out. Work in sections, one piece of trim at a time. 3) Overlaps won't show as long as you rub it all in thoroughly. I tried the overlapping parallel passes method that they recommend, and this works pretty well. I was worried that I might get a "double heavy" streak where the passes overlap but this not so unless the towelette is fresh, but this is fixable. You can do a pretty natural, casual back-and-forth motion for the most part and it comes out fine. This is NOT a super-finicky product. I made a second or third back-and-forth pass in a few areas, and used circular motion in some places where the trim was textured or a little rough from wear, and it all looked even in the end. Just rub it down into the plastic and even out the sheen while it is uncured and it's good. 4) It cures like you see it when it's still wet. It doesn't lighten up very much as it cures. It just looks a little less wet. So get it right by eye when it is wet and that's pretty much what you will still have in an hour when it is cured. 5) Don't miss a spot! You'll see it for sure if you do because the different is so dramatic. And a "second coat" is not easy or recommended. This is the only once-and-done part that you want to get right, and you have plenty of cure time to be thorough. 6) Use the folded corner of the towelette to get into small corners and edges, like where the trim meets the paint or has an inside corner or some little nook. A fresh towelette is great for getting into small areas because a feather touch applies plenty of product when the towelette is fresh. The trim now looks amazing and I am entirely satisfied. I will use Cerakote on my other vehicles. The only minor con is a strong ammonia smell when you are up close to it while it is wet. No smell once it is cured. I would definitely wear the recommended gloves while applying. As others say, you will probably drop that towelette on the ground. It's slippery when wet. Keep it folded in quarters as it comes for ease of application. Turn to a new quarter once a side gets dirty or dry and fold it inside out for four more quarters to use. Bonus, but off-label -- at your own risk: The product is not intended for the soft rubber around the windows, but I tried it there too, and it looks amazing. All I did was wash the rubber with dish soap like the trim, and I rubbed it a few times with a wet microfiber cloth to get the superficial layer of oxidized rubber off. Then I applied Cerakote. It looks great. The rubber used to be blotchy and faded. The microfiber evened this out a little. I would not use melamine on the rubber -- this made it look worse in a test section. The Cerakote made it look great: jet black, much shiner, and much more even looking. Not quite "brand new" but far better than I thought possible. I thought I might need to replace the rubber. Now it's looking great next to the jet-black new paint. This afterthought use alone was worth the money. Can you apply a second coat the next day? They don't say you can, and I don't recommend it. This is meant to be one-shot, which is why you should check to make sure you don't miss any spots. I had two areas where I tried a second coat the next day. The first was on the plastic trim between the windshield and the hood. I didn't rub this trim much with melamine beforehand so there was a lighter area (light grey originally, the worst spot) that didn't get as black as the other sections so I did it again, which helped a little, but not much. I didn't wash this area with soap beforehand because I wasn't intending to fix it until I got going. Once you put things back to black you will start noticing other faded things more. Likewise, I did a second coat on the very top of the soft rubber at the bottom of the windows (the part which faces upward and thus gets the most sun), it wasn't as shiny as the other parts, so I went over that section gently again the next day with a fresh towelette. As soon as I did it, I thought it was a mistake. This didn't go well initially because the cured coating is very hydrophobic so the new, wet, Cerakote of the second coat goes on smooth initially and then "puddles up" into little droplets a few minutes later. It doesn't want to stick to the first coat. I thought I had messed it up, but I let it cure a little until the sticky phase, and spread it out again with the towelette. It stayed that time but gathered back a little into some streaks. I spread it once more a few minutes later and it looked good. It stayed even. It looks just fine a few days later, so I think it cured OK. I hope this product last for months as advertised. Even if it doesn't I would totally do it again because the results are superior, I still have half my towelettes left, and the product is not expensive. 10/10 would do again and will recommend to everyone.
WAS THIS REVIEW HELPFUL?YesReportShare
Reviewed in the United States on June 25, 2025
R
Verified Purchase
Robert Barger
Pawtucket, US
★★★★★ 5
Easy to use, amazing results
Size: TRIM COAT KIT
This is an awesome product that is easy to use and has amazing results. My plastic trim never looked so good.
WAS THIS REVIEW HELPFUL?YesReportShare
Reviewed in the United States on May 14, 2026
N
Verified Purchase
NorthFloridaLT
Fort Morgan, US
★★★★★ 5
Made My Bumper Look Brand New Again
Size: TRIM COAT KIT, Size: TRIM COAT KIT
I used this on the plastic trim and bumper on my truck, and I’m honestly impressed with how it turned out. The faded areas came back to a deep, rich black and really cleaned up the whole look of the rear end. I prepped everything the right way by washing it first with an all purpose cleaner, then wiping it down with 91% alcohol. I also taped off the surrounding paint and chrome just to be safe. After that, the application was simple and went on smooth without any streaks or blotchy spots. The difference was immediate. What used to look dull and worn now looks factory-fresh again. It also seems to bond well and not just sit on the surface like some cheaper products I’ve tried before. Overall, this was easy to use, gave great results, and made a noticeable improvement. I would definitely use it again on other trim pieces.
WAS THIS REVIEW HELPFUL?YesReportShare
Reviewed in the United States on April 12, 2026
E
Verified Purchase
E N.
Chelsea, US
★★★★★ 4
Good product
Size: TRIM COAT KIT
Good coverage. I've had it on for about 10 days, and it's holding up better than any spray product I've used. Not perfect, but none of those streak lines you get with other products. It's been rained on twice so far.
WAS THIS REVIEW HELPFUL?YesReportShare
Reviewed in the United States on May 8, 2026
E
Verified Purchase
ernieupton
Los Angeles, US
★★★★★ 5
good product and value
Size: TRIM COAT KIT
worked great on the 10yr old outback. Lasted several months..until we traded it in for a new outback.. will find something else to use it on...!
WAS THIS REVIEW HELPFUL?YesReportShare
Reviewed in the United States on May 20, 2026

recommand products